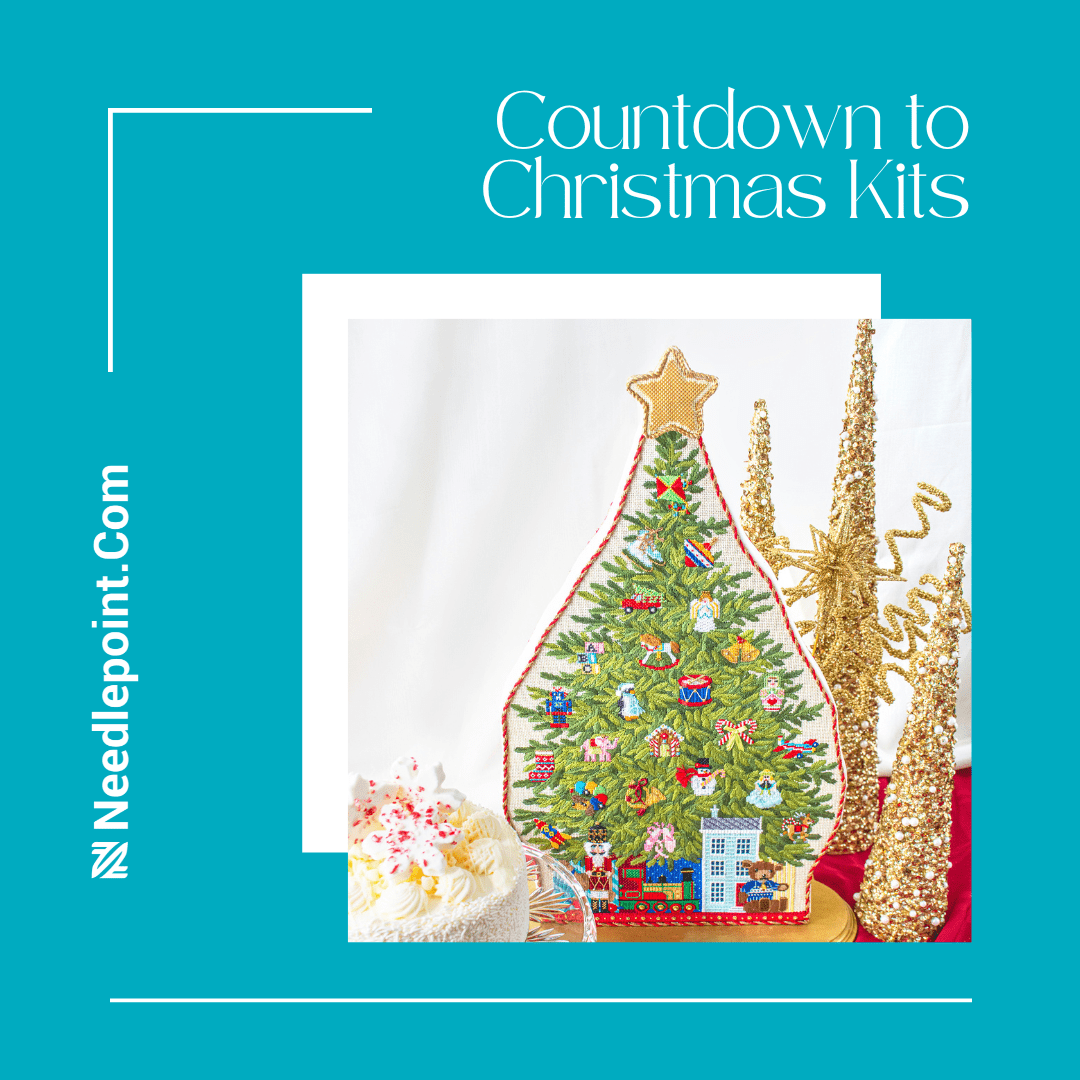
The Merry Wishes Tree is a spectacular example of the artistic collaboration between Vernon Kirk and Nancy Young. Vernon, of Kirk and Bradley Design, and Nancy of Needlepoint.Com, have been creative partners since 2015. Each year, they dream up 50 to 75 new designs ranging from 3” ornaments to the Advent Toy Store which measures 21”x15”.
That Advent piece was a limited edition that can no longer be purchased, but its success is where this story begins. We sat down with Nancy to talk about the design journey that has led to Kirk and Bradley’s latest Christmas countdown, the Merry Wishes Tree.
Needlepoint.Com: This is a unique piece that can be showcased in a couple of ways. You may display it, as stitched, or turn it into an Advent calendar with the addition of a set of magnetic baubles. How did you and Vernon come up with this idea?
Nancy Young: In 2015 Vernon Kirk and I designed the Toy Store Advent Calendar as a limited edition for Kirk and Bradley. People absolutely loved it. However, it was a large project made up of a building backdrop, 24 windows and a door. This was our first venture into adding magnets to needlepoint and we worked with Diana Sagmoe, The Needlework Finisher, to be certain we could add magnets and keep the stitching safe. She figured out how to put a magnetic board behind the building, then sew magnets into each little window. When it’s complete, you stick a window onto the toy store each day until Christmas Day, then you add the door. It’s as if the store’s windows are lighting up to reveal a special toy each day. It’s a beautiful piece, but it was large, took a lot of time to stitch and a lot of money to finish, and that made it somewhat prohibitive.


So this time, Vernon and I reversed the concept and decided the Merry Wishes Tree should be able to stand alone or be used as a countdown. The children’s toys are stitched onto the tree and you have the option of buying the magnetic baubles in order to turn the piece into a Christmas countdown. The baubles are red and green and numbered 1 through 24. At the beginning of Advent, you cover each stitched ornament with a bauble, then remove one a day until Christmas. The star is also magnetic and goes on top Christmas morning. With this piece, you reveal a new toy each day.
Needlepoint.Com: The tree itself is very realistic looking thanks to the way you stitched each pine bough. It looks a little intimidating. Is it difficult?
Nancy Young: It’s intimidating only if you look at the tree in its entirety. If you take it one branch at a time, you can see that it’s not difficult at all. You start on the outside edges and do the lightest colors first, then work inward toward the darkest areas. As you go, you will be defining the dark areas before you get to them. I think it’s best to keep three needles threaded at all times and switch thread colors as you layer the branches. You just move back and forth until you get the effect that suits your eye. I stitched this during the Christmas season and literally sat in front of my own tree so I could get things just the way I wanted them. It’s important to remember you don’t need to stay strictly true to the paint on the canvas as you do the branches.
Needlepoint.Com: If I were stitching this, I would want to start with all the fun ornaments. Is that the right way to approach this piece?
Nancy Young:You could because you don’t necessarily need to do the branches first. However, you will end up compensating a lot of the branches around the ornaments. If you really dislike compensating, you might find it easier to do the branches around each ornament first.
I do recommend putting this piece on a scroll frame, starting at the top and working down the tree. If you do this, you should put acid-free tissue paper in between the canvas layers as you roll up your worked areas. That way you’ll protect the decorative stitches and beads. You can even place a little cotton make up remover pad over each ornament for extra protection.
Needlepoint.Com: How many different stitches are in this piece?
Nancy Young: There are 70 stitch diagrams, but many of those are variations on a stitch. For example, I used six variations of Knitting Stitch, several variations of Gobelin Stitch, two kinds of Turkey Work and so on. You can see how easy it is to get to 70 stitches this way.
Needlepoint.Com: This is obviously an heirloom project and I would consider it aspirational. What would you say to someone like me who has stitched for years, knows how to follow a diagram, and knows about a dozen decorative stitches? Is this something I could actually do?
Nancy Young: This is nothing more than an intermediate project. It’s not gold work embroidery or blackwork or any of the really advanced needle arts. It may be bigger than other projects, but when you break this piece down into small areas, it’s really not difficult. I taught this for two virtual retreats in January and February. No one in the classes thought this was too difficult for them. In fact, three women have already finished it and each of their trees is absolutely beautiful.
Needlepoint.Com: What types of tools do you recommend acquiring before starting this project? Are there extra supplies someone should have on hand for this?
Nancy Young: Yes, I think you will do a better job if you have a laying tool and really good embroidery scissors. I also believe using a scroll frame will help because this canvas is rather long. You could also do this on stretcher bars if you’re more comfortable working on them, but if you do that, I really recommend a stitching stand so you’re not trying to hold the piece while you stitch. Also, a bead holder will come in handy because there are a lot of beads and tiny metallic embellishments that tend to escape into the couch cushions unless you keep them on a sticky surface. I also used several hot fix crystals for eyes and buttons, so if you purchase a hot fix applicator, you can do this at home. However, you may also send your stitched piece to us and we can apply the crystals for you in our store.
Needlepoint.Com: Finally, could you explain the baubles and how they work?
Nancy Young: We had those specially made by an acrylics manufacturer who works with needlepoint stores. We wanted them to be completely smooth so they wouldn’t catch on the stitching. We designed them with a little square cap on top where we could apply a magnet to the back. Having the magnet on the cap allows you to place that in the branches of the tree and not on the stitched ornaments, many of which have beads. The tree has a magnetic board on both sides so you can store the baubles on the back of the piece when you remove them from the front. The tree is also weighted and placed on a decorative base so there is no chance it will tip over.
Needlepoint.Com: Thank you for sitting down with us to explain everything, Nancy.
This fully kitted project comes with a hand-painted, 18 count canvas, overdyed and other specialty threads, assorted beads, metallic accents, bells and hot fix crystals. The stitch guide is a 44 page book containing diagrams, descriptions and full-color photos to guide you through every stitch. You can order yours today at Needlepoint.Com by clicking here.


